4WinBoot (Windows Boot Genius) – Disk Tool: How To
4WinBoot (Windows Boot Genius) offers you an all-in-one disk tool to help you safely and efficiently clone entire disk/ partition, perform disk/partition backup, manage partition, and remove all data off the hard drive and partition permanently with the easiest steps. To get started, download Tenorshare 4WinBoot and install it on any PC you can access.
1. Create a Bootable Disk
Run the program and insert prepared CD/DVD disk into the CD-ROM drive or connect USB flash drive into a USB port on computer. Then click "Burn" to start burning process..

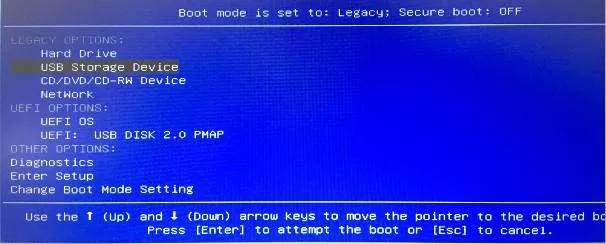
2. Boot Your PC from the Bootable Disk
Insert the newly burned bootable disk to the computer that won't boot. Continuously press "F12" to set the computer boot from USB or CD/DVD/CD-RM device depending on what is your disk. Lastly, tap "Enter" and you will see an integrated page of program.
Note: The detailed steps slightly differentiate from computer brands and Windows versions. If you have any difficulty booting up from disk, please take Set BIOS to Boot Computer from CD/DVD/USB for reference.
3. Clone Entire Disk
Click "Disk Tools" and then select "Clone Entire Disk" from the left list.

Here your all hard disk on computer are listed with name, type, size and capacity. Select one you want to clone and click "Next" to move on.

Click "Start" to initialize cloning. You can check the progress with "Progress Indicator". The time this step will take depends on how large the file size is.

4. Clone One Partition
Click "Disk Tools" and select "Clone One Partition" from the left list.

Here your all partitions on computer are listed with name, type, size and capacity. Select one you want to clone and click "Next" to move on.

Click "Start" to initialize cloning. You can check the progress with "Progress Indicator". The time this step will take depends on how large the file size is.
5. Back up Disk
Click "Disk Tools" and select "Disk Backup" from the left list.

Here all of your disks on computer are listed with name, type, size and capacity. Select one you want to clone and click "Next" to move on.

Unfold the disk layer by layer to check and select an image you need to back up. Then click "Next" to start backing up.

Here are three options for you to specify the compression level. The higher compression ratio is, the more time will it take and the less archive files size will be. After that, click "Next" to last step.

Click "Start" to initialize backup. You can check the progress with "Progress Indicator". The backing up time depends on how large the files size is. Please wait patiently.

6. Back up Partition
Click "Disk Tools" and select "Partition Backup" from the left list.

Here all of your partitions on computer are listed with name, type, size and capacity. Select one you want to back up and click "Next" to move on.

Unfold the partition layer by layer to check and select an image you need to back up. Then click "Next" to start backing up.

Here are three options for you to specify the compression level. The higher compression ratio is, the more time will it take and the less archive files size will be. After that, click "Next" to last step.

Click "Start" to initialize backup. You can check the progress with "Progress Indicator". The backing up time depends on how large the files size is. Please wait patiently.

7. Restore Disk
Click "Disk Tools" and select "Disk Restore" from the left list.

Unfold the disk layer by layer to check and select image you need to restore. Then click "Next" to start disk recovery.

Specify the location where your restored files will be reserved. Click "Next" to initialize backup. This restoring time depends on how large the files size is. Please wait patiently.
8. Restore Partition
Click Disk Tools and select Partition Restore from the left list.

Unfold, check and select the partition you need to restore layer by layer. Then click "Next" to start partition recovery.

Specify the location where your restored files will be reserved. Click "Next" to move on.

At this stage, click "Start" to initialize restore. You can check the progress from Progress Indicator. This restoring time depends on how large the files size is. Please wait patiently.

9. Create a Partition
Click Disk Tools > Select Partition Manager > Select the unallocated space > Click Create button > Enter partition properties and set file system, partition label, drive letter, partition type and cluster size of new partition > Click Yes > Tap on Apply.

10. Format a Partition
Click "Disk Tools" > Select "Partition Manager" > Select Partition > Click "Format" in the interface > Select the file system, drive letter and allocation unit size > Click "Yes" > Tap on "Apply".

11. Delete a Partition
Click "Disk Tools" > Select "Partition Manager" > Select partition > Click "Delete" > Tap on "Yes" > Click on "Apply" to finish.

12. Resize a Partition
Click "Disk Tools" > Select "Partition Manager" > Select the partition you want to shrink or extend > Click "Move/Resize" on the menu > Drag the slide bar to input the partition > Click "OK" > Tap on "Apply" to perform the operation.

13. Wipe a Partition
Click "Disk Tools" and select "Data Wipe" from the left list.

Three models are presented to you. Click "Wipe Partition" to go on.

Now all the partitions on your computer are listed here and you can select a partition to erase. Later, click "Next" to start erasing. Click "Yes" to make confirmation when a pop-up window comes to you.

14. Wipe Specific Folders
Click "Disk Tools" > Tap on "Data Wip"e > Click "Wipe Specific Folders" to go on > "Import" the folder that you want to erase > Click "Next" and make confirmation.

15. Wipe Files
Click "Disk Tools" > Tap on "Data Wipe" > Click "Wipe Specific Folders" to go on > Click "Add" to import the files that you want to erase > Click "Next" and make confirmation.
