- ReiBoot
- 4uKey
- UltData
- iCareFone for WhatsApp Transfer
- 4MeKey
- 4uKey for Android
- iAnyGo - iOS Location Changer
- UltData for Android
- ReiBoot for Android
- iCareFone
- 4uKey - Password Manager
- TunesCare
- TunesCare for Mac
- 4uKey - iTunes Backup
- 4WinBoot
- Windows Rescure
- Password & Key Recovery
- Data Recovery
- Disk Tools
- 1. Create a Bootable Disk
- 2: Boot Your PC from the Bootable Disk
- 3: Clone Entire Disk
- 4: Clone One Partition
- 5: Back up Disk
- 6. Back up Partition
- 7. Restore Disk
- 8. Restore Partition
- 9. Create a Partition
- 10. Format a Partition
- 11. Delete a Partition
- 12. Resize a Partition
- 13. Wipe a Partition
- 14. Wipe Specific Folders
- 15. Wipe Files
- How to Boot from CD/USB?
- How to Boot from USB in UEFI BIOS?
Guide: How to Recover Deleted Photos from Android without Root
Actually, the fastest way to get the lost photos back is using the third-party software. But almost all of the android recovery software on the market require you to root your android device, otherwise it's unable to scan the data. Rooting Android is never going to be easy, and also there are some risks you might face when you root your Android Phone. However, UltData - Android Data Recovery is such a software that can help you retrieve lost photos without rooting. Supported devices includes Samsung, Huawei and Moto Z.
To get started, download Tenorshare UltData - Android Data Recovery and install it on your PC. Then follow the guide below to recover lost photos from Android.


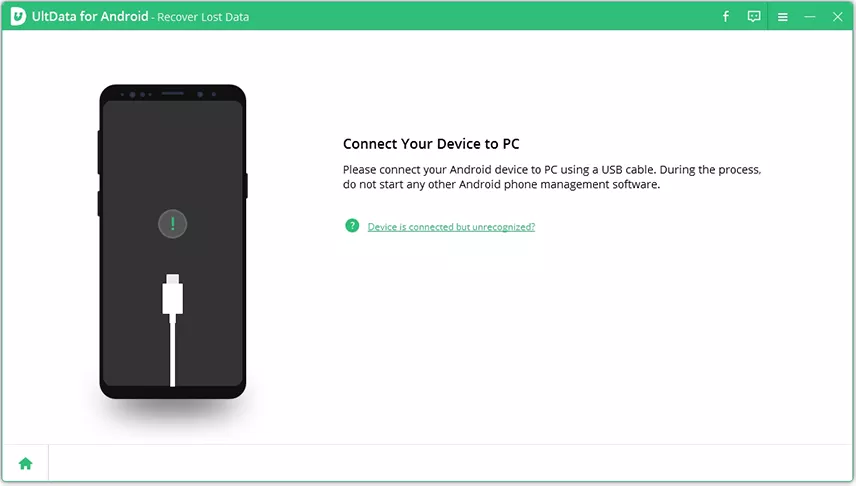
Step 1. Connect Your Android Device
Launch the program and select the feature "Recover Lost Data".
Then connect your Android device via the OEM USB cable. (During the process, please do not launch any other Android phone management software.)
Step 2. Enable USB Debugging
Before scanning the data, you need to enable USB debugging on your Android phone. Follow the instruction below:
- First, click the “USB Charging” from the Phone taskbar and switch USB option to "Transferring files".
- Go back to “Settings”, search "Build" and choose "Build number" on result, then tap it 7 times.

Tip: Still unable to enable the USB debugging or connect your device to PC? Don't worry, click the button on the bottom left or right, it will give you a further guide.

After enabling the USB debugging, you need to allow the authorization on your device to allow USB debugging. Once the uUSB debugging is enabled, your device will pop up a window to ask you allow the the authorization on your device. Simply click "OK". If the window doesn’t appear, please click “Show Again” on the program.

Step 3. Start Scanning
Choose the files types you'd like to scan when connection is finished. Then click on "Next". The software will scan your deleted/lost photos on your device.

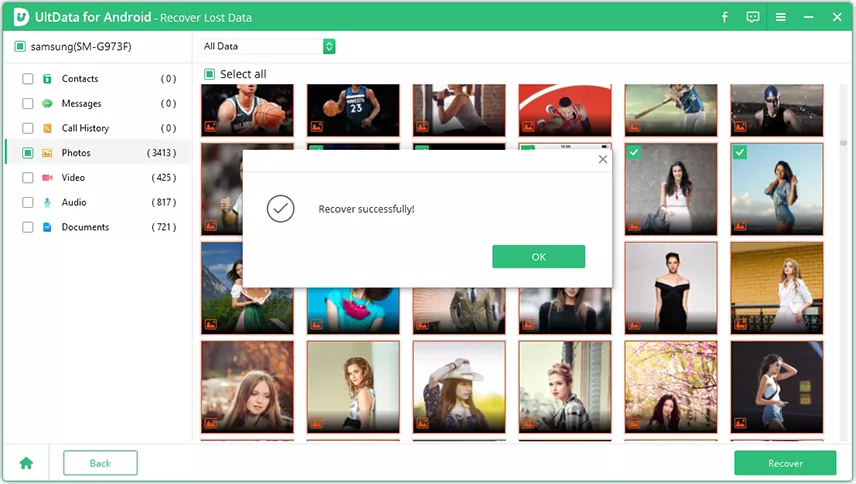
Step 4. Preview And Recover The Lost Photos
After scanning, the program will display all picture data, including the deleted pictures. You can preview the photos before recovery.

Select the photos you want to recover and then click the “Recover” button in the lower-right corner.