How to Disable Excel Read Only on Mac
Microsoft Excel is used for different purposes by individuals alone and in groups too, when number of people have access to Excel file data then it is very important to safeguard it from unwanted deletion and modification. Excel provides a feature to mark sensitive files as read-only. Number of people have also reported that there Excel files automatically become read-only when they open the file second time. This is also discussing, why it happens and how to fix it. If you are already aware of making your files read-only or it has become one automatically and now you don’t know how to disable read only in Excel Mac, then follow the below solution to disable read only protection.
Solution 1: Check Read-Only Status
In Mac operating system you can secure your Excel file by making it read only, if you want to disable this feature then follow below instructions carefully:
- Step 1: Open the Finder. Navigate and find the Workbook you want to protect.
- Step 2: Now select the workbook.
- Step 3: On the “Action” pop-up menu clicks the “Gear” icon.
- Step 4: Now, click “Get Info”
- Step 5: Select the “General Pane”
- Step 6: Now, finally clear the “Locked” check box


Note: One thing is important, that you must be owner of the file and must have Write privileges in order to clear read-only and if you have shared your workbook with any other person having write privileges then he can also set and clear read-only. You can set password protection to make t more secure.
Solution 2: Removing Slash Symbol while Saving
Another thing has been observed that Excel files get automatically read-only if you have used a “/” symbol while saving the file. Removing the slash symbol will fix read only Excel Mac problem. This how you can do this:
- Step 1: Click “File> Save As”.
- Step 2: Save the file name without slash as shown in picture.

Solution 3: Clearing Read-Only Recommended in Excel Mac
Microsoft Excel also has a built in setting to set and clear read-only option, make sure it is turned off if you want to disable protection. This is how to remove read only Excel Mac easily:
- Step 1: Open the Excel file, for which you want to disable Read-Only.
- Step 2: Click “Excel” on the top menu.
- Step 3: Click “Preferences” option, it will open a preference menu.
- Step 4: Click “Security” under “Sharing and Privacy” heading.
- Step 5: You will see a new screen where you can clear “Read-only recommended” checkbox.
- Step 6: Now save the file and exit the program.


I’ve discussed some of the most general ways you want use to disable read-only protection for Microsoft Excel files in Mac. One thing must be noted here that these solutions doesn’t unlock password protection from Microsoft Excel files. In order to remove that password decryption, you will have to use other approaches. I’ve recommended a program below which can be used to bypass password protection easily for all version of Microsoft Excel spreadsheets and workbooks.
Bonus Tip: How to Unlock Excel Files
If you know how to fix Excel for mac read only problem, but don’t know how to unlock Microsoft Excel files, in case you forget your password, you can use an all in one Excel file unlocking tool that we have recommended below.
PassFab for Excel is an Excel file password unlocker that can be used to unlock password to open and password to modify both. This method works for almost all versions of Microsoft Excel files. It can unlock your password very easily with brute force attacks, it features 3 different kinds of brute force techniques. It is capable to unlock both workbooks and spreadsheets and supports multi core CPU and GPU acceleration for faster unlocking speed. This is how you use this program to unlock Excel files:
- Step 1: Open the program.
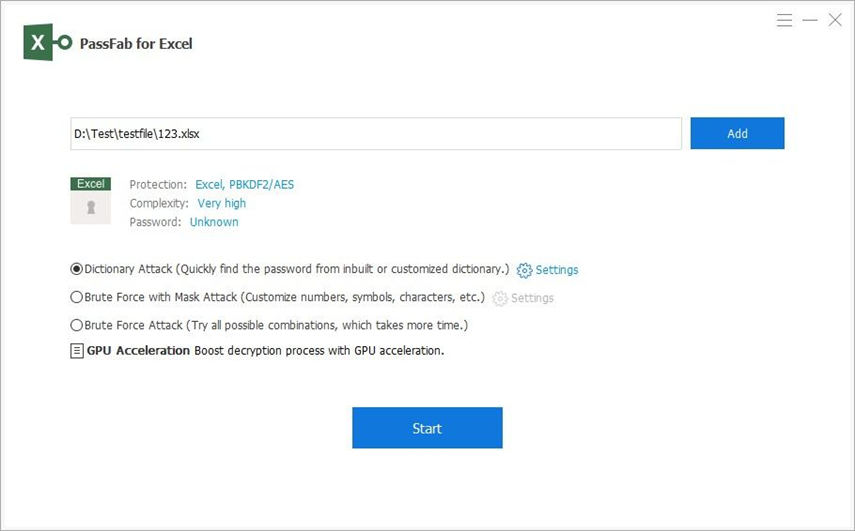
- Step 2: You will see below interface, Now click “Add” to import to import Excel spreadsheet whose password you want to recover.
- Step 3: There are 3 types of attack available, Brute force, Brute force with mask, Brute force with dictionary. Choose the attack type and set parameters accordingly.
- Step 4: Click “Start”, this will initiate brute force attack, it may take time according to password length and complexity.
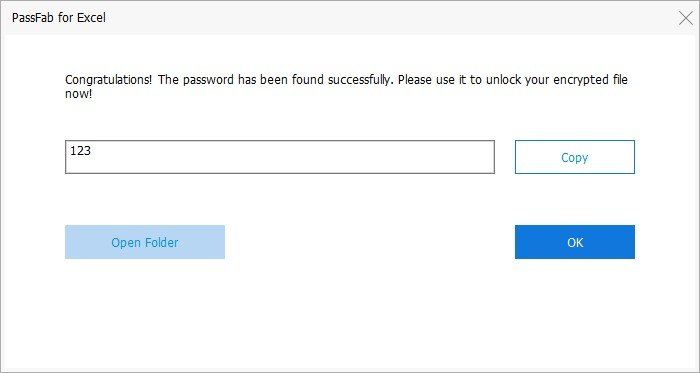
- Step 5: Your password will be cracked once the attack is complete and a window will pop up having the password.

Note: Dictionary Attack can be used when you already have a dictionary file, Brute force with Mask attack let you crack the password with whatever you remember, Brute force attack will try all the combinations to unlock the password.


These were some of the best solutions you can use to disable read-only protection for different versions of Microsoft Excel files. In addition to that I’ve also recommended an awesome program which takes care of password protection and can bypass the security in case you have forgotten your password. You can try out the solutions given in this guide to eliminate read-only protection problems.
Product-related questions? Speak directly to our Support Team >>
